Monday, December 28, 2009

until the new year comes.....

So, we enter the annual season of lists, recaps of those who left us, and the setting of dreaded resolutions. The latter is the most personal and the one that really chaps our hide by February first. While the gossipy list of scandals entertains our pedestrian selves and it is a time when we reflect on the missing place setting, it is the imposing of a pledge that forces a countdown.

Given the clicking off of this end of the year and the realization that the first decade of this new century is coming to a close, my resolutions are being culled from a broad swath - goals yet to be achieved, personal habits to be adjusted and future dreams to be laid-down.

But what the heck, I still have four days to indulge in naughty habits and eat way too much sugar. The Holidays fills my house with an unusual amount of chocolates – probably the only time of year I actually eat chocolate. A thoughtful friend knew well to bring white chocolate. Though my weakness is cake. Unfortunate, but fortunately, it is a quiet time for work and I can spoil myself with wicked forkfuls.

Old fashion Hummingbird, basic white cake with buttercream, cheesecake or carrot cake all fair game for my Yuletide excess. So, for a few more days eat cake.


My Mother's Fabulous Carrot Cake - yields two 9" cakes
1-1/2 cups canola oil
2-cups sugar
4-eggs - separated
1/4-cup hot water
2-1/2 cups flour
1-teaspoon baking soda
1/2-teaspoon salt
1-1/2 cup grated carrot
2-teaspoons cinnamon
1-cup currants - optional

Mix the oil, sugar and egg yolks until creamy pale yellow. Add the hot water, flour, baking soda and salt, and mix to incorporate thoroughly. Add the carrots, cinnamon and currants. Beat the egg whites to a stiff peak, but not dry.

Fold the egg whites into the carrot mixture. There should still be some clumps of whites visible. Split between two 9" cake pans, and bake in a 350 degree oven for 20 to 30 minutes, or until a cake tester inserted comes out clean.

Filling for Carrot Cake
14 ounces sweetened condensed milk
3 egg yolks - beaten
1/2-cup sugar
1/4-pound butter
1-cup pecans - whole
1-cup coconut - grated
1-teaspoon vanilla

In a one-quart saucepan mix all the “gook” ingredients together, and over a medium heat cook the filling to thicken. The filling must be kept moving and will coat the back of a spoon when done. It takes about 15 minutes of constant stirring, and I mean constant stirring. Left unattended over the heat the eggs in the filling will curdle. You can do as my mother used to do, and make one of her three children stir, as my sister and I called it, the gook.

Cool the "gook" and put half between the two layers of the cake, and then spread the remaining over the top. Store this cake un-refrigerated.

Wednesday, December 23, 2009

Precious Joy

scurrying about
bags overflowing with cheer
families gathering


Braised Short Ribs – yields 6
5 pounds short ribs – trimmed of excess fat
1/4-cup all-purpose flour
2-teaspoons canola oil
2 large onions – diced
4 ribs celery – diced
2 small carrots
3-inch piece fresh ginger – peeled and diced
1/4-cup diced dried dates
1/4-cup fresh thyme leaves – chopped
Large pinch of saffron
4 whole black cardamom pods
1-bottle red wine
1/2-cup fresh Italian parsley leaves
Salt and freshly ground black pepper to taste

Dust the short ribs with the flour.

In a 12-quart pot over a high heat, add the oil. Brown the ribs in two batches. Remove the browned ribs, and pour off any oil that pooled in the bottom of the pot.

Add the onions, celery and carrots to the pot, and cook until lightly browned. Then add the ginger, dates, and the browned short ribs. Mix to combine.

Add the thyme, saffron, cardamom and pour over the wine. Bring the wine to a boil, and then reduce to a simmer. Cover with a lid, and simmer for three to three and half hours. Add the parsley, salt and pepper, and cook uncovered for an additional half hour.

Friday, December 18, 2009

Baby it is cold outside

I sit on my sofa, a throw draped over my shoulders and a cup of hot tea within arm’s reach. Yes, winter is here even if the solstice has yet to arrive. My farmer’s market has shrunken to a small contingent of hardy vendors offering yesterday’s haul from the sea, root vegetables that cellar through the winter as well the Amish table filled with Moon pies, and farmer’s cheese.

I troll the market these days walking away with an apple or two, some pears, a bunch of kale and perhaps, parsnips. During the peak of the season it is easy to derive ninety percent of my foods locally, but now it is the complete opposite. Fortunately, I have squirreled away a freeze full for just this time – much to my partner’s annoyance. While he may complain about the lack of available space for his pint of ice cream he does not seem to be riled by the meals it helps produce. Now, I can live with the constant digging through, and re-organization of my freezer. What gets me is going to a grocery store to items to flesh out my creations. I walk around and around in a haze, finding it difficult to hear the siren’s call to eat.

Inevitably I settle on mushrooms, celery, jicama, or baby arugula all in the hopes to put something on the table, and making sure what I have stockpiled doesn’t run out too quickly.

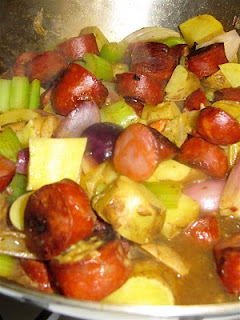
Chorizo and Potato Stew – yields 4 to 6 servings
1-pound chorizo – sliced into 1/2-inch pieces
1 onion – cut into 1/2-inch pieces
3-garlic cloves – roughly chopped
3-celery ribs – cut into 1/2-inch pieces
1/2-cup canned tomatoes – drained of juice
1/2-pound potatoes (preferably Yukon gold) – cut into 1/2-inch pieces
Salt and freshly ground pepper to taste

Heat a 10-inch skillet or a wok over a medium heat, and add the chorizo. Brown the chorizo well.

Once the chorizo has browned add in the onion and celery. Brown the onion mixture then add the garlic, tomato and potatoes. Pour in 1/4-cup of water. Cover the pot and lower the heat to a simmer. Cook for 30 to 45 minutes. Season with salt and pepper.


Sunday, December 13, 2009

Cookie Monster

Is it the holiday season or the deepening cold that has me desiring, and subsequently baking cookies? I would have to believe it is the latter given that I have not been invited to participate in a holiday cookie exchange ever, and I know, given previous years, I will continue to crave small little cakes well past the yuletide.
I am very particular about which types of cookies will feed this seasonal urge. You won’t get an oatmeal-raisin or any other dried fruit-studded biscuit setting up in my oven. No, they must be rich and rife with nuts and in all probability strewn with chocolate, white chocolate that is. I don’t mind if they are crisp or chewy as long as they are fresh. I tend to make the cookie batter, bake off a day or two’s allotment, then freeze the remaining dough which is rolled into a log for easy whacking off at a moment's notice. Yes, this keeps me in right-from-the-oven pleasure, but it definitely curtails my daily snacking.

I am not sure what got into me the other day, but there I was thinking peanut butter cookies, and I rarely, if ever, eat peanuts. So of course, there was no peanut butter in my refrigerator, but there was macadamia nut butter made a couple weeks earlier.

One would wonder why in this Skippy-spreading culture of ours, there would be no peanut butter but macadamia. That is an easy answer, for while I was a fanatical fluff and jelly sandwich youngster, I have grown to appreciate the potential of a nut spread. Having run out of cashew butter, my usual nutty smear, I decided to throw macadamias into a food processor, and let them whiz until they became a smooth, decadent spread. Any nut can be treated in this fashion, and the yield is approximately one-cup whole produces one-cup processed. I figured that peanuts and macadamias were both high in fat, so why not an alternative version? To my satiating pleasure it did work, and a trail of crumbs can now track me down.


Macadamia Butter-White Chocolate Cookies – yields approx 24
1/2-cup light brown sugar
1/2-cup white sugar
1/4-pound (1 stick) unsalted butter
1/2-cup macadamia butter
1 egg
2-teaspoons vanilla
1-1/2 cup all purpose flour
3/4-teaspoon baking soda
1/2-teaspoon baking powder
Pinch of salt
5-ounces white chocolate – roughly chopped


Beat the sugars and butter together until light and fluffy. Scrape down the sides of the bowl, and add in the macadamia butter. Beat the sugars and butters again until smooth. Beat in the egg and vanilla.

Sift together the flour, baking soda , baking powder and salt.

Mix the flour into the sugar/butter mixture, and then stir in the white chocolate to distribute throughout the dough.

Chill the dough in the refrigerator for an hour or two.


Pre-heat the oven to 350-degrees.

Place about a tablespoon’s worth of the cookie dough on a parchment-lined baking tray, and gently press to flatten – making it about 1/4-inch thick. Cook about nine per baking tray with about 1/2-inch between each cookie. Bake for 11 to 12 minutes. Remove the tray from the oven, and then allow to cool for a minute or two before transferring to a cooling rack.


Wednesday, December 9, 2009

the belly of the beast

I will readily confess that almost anything swine appeals to me, save perhaps a bout of influenza, or those pickled feet sitting in a jar by the cashier at the quickie mart. My old go-to, particularly when trying out a new restaurant, was the chicken entree. It was my belief if the kitchen could not produce a decently cooked avian piece of meat how could I trust anything else coming out of their workspace. Over the past years, my focus and barometer for a baseline achievement has become the pig.

Thanks to a Ladies Home Journal, of 1971, my mother started to make a delicious baked ham studded with cloves. Of course, who could pass up Sunday morning’s crispy strips presented right next the spread of bagels, lox and white fish. Clearly, I did not grow up with the cultural taboos around eating pork, so I cannot explain way my adult admiration for this meat as a recalcitrant dismissal of a childhood banned consumption. When it comes to roasting I think no other meat holds up as well giving me the caramelized crunch I adore coupled with a moist chew.

I have been slow roasting pork shoulder for years, perhaps marinated in slightly over-aged kimchi, or rubbed with a citrusy annatto paste as well as pierced with copious quantities of garlic, which then gets hours of a smoky bath.

Over the past few years, one cut from the pig has become a rising star. Pork belly has definitely become all the rage, and I have to assume this increased interest has affected its value on the Chicago commodities exchange. If you remember the fat-phopic period of the nineteen nineties it is an amazing turn-about in our eating habits. I had a friend back in the dawn of that decade that endeavored to import a fantastic line of cheeses from Australia. Having lived and worked down-under I was very familiar with the potential of these products – I still can taste the lavender speckled farmhouse truckle that married so well to caramelized fruits. Within a year and half the office was packed up, and the American market was robbed of its pleasures.

Fads and trends clearly move on, and in this case with a whiplash (or more precisely, cardio-vascular) like effect.


Braised Pork Belly – yields 4 to 6 servings
2-1/2 pounds pork belly
6 garlic cloves – chopped
1 medium onion – sliced
3 celery stalks - sliced on an angle
1-1/2 inch piece ginger – peeled and sliced julienne
1/4-cup soy sauce
1/4-cup mirin
2-tablespoons white distilled vinegar
2 whole star anise

Pre-heat the oven to 450-degrees.

Score the fat cap of the pork with your knife to create a crosshatch pattern. Don not cut through the fat into the meat.

Toss the onion, celery and ginger together, and place on the bottom of a 4 by 6-inch roasting pan. Place the pork on top of the vegetables. Cook the pork belly in the oven for an hour, or until a crisp top has been formed.

Then pour over the soy sauce, mirin and vinegar, and snuggle in the star anise. Lower the oven heat to 325-degrees, and cook the pork belly for an additional 2 hours.

Remove the pork to a plate, and pour the fat and caramelized vegetables into a fine sieve. Allow the fat to drip into a container (use the fat dripping to sauté potatoes on another day).

Slice the pork, and garnish with the caramelized vegetable.


Sunday, December 6, 2009

Here it comes

I have never been one who waxes lovingly about wintry moments rather it is usually the season when I dream of escape. Pine for the seemingly intolerable heat of August and the irritation of sand brought home from the beach. I suffered the cold terribly, and remember a ski trip as a child that left me degrees from hypothermia, that turned out to be a downhill ice-skating outing that left me grateful to make it to bottom unbroken. Not being a fan of chocolate the ubiquitous hot brew awaiting everyone offered no enticement for this ridiculous exposure. If only they served hot Strawberry Quick.

Though today the sky wore that wooly grey pullover of the cold months, and the air filled with a chill. At first, it was wet spiting than large clumps of frozen confection floated on down, and a gentle wonder and joy overtook me. How queer…how unexpected. As I walked, sufficiently bundled, welcoming this transition I started to dream of the activity this climate allows me to enjoy in my kitchen. In my mind I went through my inventory of canned, pickled and preserved items now allowed to be set free. I have a rule that I will not use any of my preserved spring and summer treasures until the first snow.

My personal contentment with the warmth is not shared with my apartment – even with nine windows for more than cross ventilation the whole place becomes a warming oven. Not the most comfy environment for most folks.

Now, during these months when the days hover at the lower end of the thermometer the tropical atmosphere I inhibit becomes conducive to not only cooking, but also having others over to share the meal – be it a formal sit down or a casual nosh around a movie this is the season to be cooking.


Crisp Miso Chicken Wings – yields 4 servings
1/3- cup white miso paste
2-garlic cloves – crushed to a paste
1-teaspoon hot sauce
1-teaspoon sesame seeds
1/4-cup rice vinegar
1/8-teaspoon freshly ground black pepper
1-1/2 pound chicken wings

In a bowl mix together the miso, garlic, hot sauce, sesame seeds, vinegar and black pepper.

Toss in the chicken wings and coat the chicken well with the miso mixture. Cover, and refrigerate for 8 hours.


Pre-heat the oven 400 degrees.

Remove the chicken from the bowl and place a parchment lined baking tray. Cook the wings for 45 to 60 minutes.


Wednesday, December 2, 2009

Hunting

When I was a culinary neophyte it seemed that on any given day I could go out and discover something new. Now, given my culinary heritage the exotica that resided in my family pantry consisted of dill, garlic, paprika and barley. So, I grew up with leeks as an edgy choice. It was the seventies after all, and I was in the culinary wasteland of the New York suburbs, and the Silver Palate Cookbook had yet to introduce American cooks to balsamic vinegar, sun-dried tomatoes and capers. Still, this initial awakening was myopic completely focused on the European sensibility of our society. Limited but welcomed nevertheless.

When I finally moved into my first place, a tiny studio apartment where the front two burners of my stovetop served as the resting place for my cutting, and sported burn marks from turning the wrong burner. Though now in my own home I was free to explore, hunt and discover the fuller breath of our diverse population’s cravings. I remember a magical spice shop on the upper eastside of Manhattan that would today seem like a set from a Harry Potter film – it was dark, a little musty with floor to ceiling cupboards that had small drawers containing every imaginable spice. This is where I found the chervil I needed for a goat cheese soufflĂ© I was planning to make. Heading south to Chinatown gave me a leafy broccoli, ginger, rice vinegar and sticky rice. Those halcyon days when my life revolved around the dinner party I would host most Saturday nights meant a day of searching.

These days’ jicama, purple potatoes, nori sheets and chipolte chilies can be found just across the street in my neighborhood market. We have come a long way but I miss the hunt. The simple discovery of orangey-umber hued persimmons during the autumn of my first year of culinary school in San Francisco was a moment of wonder, and left me agog with ideas – once I learned that the two varieties needed to be treated differently. The Fuyu, which is more apple like in shape and is to be eaten hard. As opposed to the Hachiya with its more oblong shape that must be eaten so soft you would most likely think it is over-ripe. Bite into one of these under-ripe persimmons, and it is like sucking on an eraser filled with a day’s worth of chalk – I will never make that mistake again.

It is still possible to discover new foods my search has just broadened. I will scour the outer boroughs of New York, or no matter where I travel to I seek out farmer’s markets, grocery stores or any other opportunity I have to shop for a culinary treat.


Persimmon Salad – yields 6 servings
4 persimmons (Fuyu variety)
1 Asian pear
1-small English cucumber
1serrano chili
1-pound jicama
1-tablespoon orange zest
1/2-cup cider vinegar
6 scallions – thinly sliced
2-tablespoons chopped mint leaves
2-tablespoons canola oil
1/2-teaspoon salt


Slice the persimmons, pear and cucumber into about 1/2-inch pieces. Finely mince the serrano chili, and place the ingredients into a work bowl.


Peel the jicama and then slice into 1/2-inch pieces, and add to the persimmons. Toss in the orange zest, cider vinegar, scallions, mint, canola oil and salt. Allow the salad to sit an hour or two before serving.