Is it possible that we are nearing the end of the biblical deluge that has pelted the northeast for the most part of this month? I am not totally convinced, being the skeptic that I am so, I am waiting to see if the seven plagues begin showing up. Then perhaps I will be a believer. In the interim the rapture is taking the form of the first cherries that have managed to survive and become potent even during this rather molding stretch.
Lost already, due to the steady steam from above, are those precious gems that under ordinary circumstances struggle to survive given that everyone and everything desire’s to nibble on them. Strawberries at this point must be written off until next year with the supreme hope that June remembers it is supposed to be sunny and warm.
Moving forward harboring no grudge I embrace nature’s readying replacement. Excitedly, those dangling crimson orbs are here. Cherries are the first of the stone fruits, and an absolute indication that summer has arrived irrespective of all that has not been. I hope and pray that now the sun shines down upon these trees further ripening explosive, juicy drupelets for us all to enjoy. I am chanting, here comes the sun, and hope the next sign is not the blistering, rot of excessive moisture but rather the heavenly redolence of the cherries’ expectant cousin, the peach.
Cherry Trifle - yields 6 to 8 servings
1/2-cup sugar
Zest of one orange
1-1/2 cups fresh orange juice
1-pound mascarpone or sour cream
6 Egg Whites - beaten stiff
1-pound cherries – pitted and cut in half
2 pounds Lady Finger cookies or stale pound cake
1/2-cup grated chocolate
In a 1-quart saucepan heat the sugar, zest, and orange juice, and cook until the sugar is dissolved and syrupy - but not caramelized. Cool. Whip the egg whites to stiff peak with a hand beater or in a standing mixer, and pour in the sugar syrup while it is still warm slowly into the egg whites to completely incorporate. Keep the egg white mixture whipping as you pour in the syrup, and continue until the egg mixture is cool. Fold in the egg whites into your mascarpone thoroughly.
In a trifle dish or a high rim 9" glass pan place a single layer of the Lady Fingers down. Spread a layer of the mascarpone and sprinkle over some of the cherries. Repeat this layering ending with a layer a mascarpone. Sprinkle the chocolate over the top. Refrigerate 8 hours or overnight before serving.
Sunday, June 28, 2009
Monday, June 22, 2009
Blooming Garlic
In the market for the last couple of weeks has been the bolting flower stem of garlic. Presently, this stalk emerging from the center of the sub-terrain bulb seeking the sun or an eager chef is the unopened blossom and subsequent seedpod of the kitchen’s most ubiquitous ingredient.
Somewhere along the line these gently, scented nascent flowers got marketed as garlic scapes….I think someone had either a heavy accent or a speech impediment for they are truly escaping from the plant. Regardless, of how they are referred to or how they got their curious name this is an exciting time in the garlic season. Most of our local farmers are harvesting the scapes separate from the rest of the plant to sell them to us, and how fortunate we are. For otherwise, you would be buying a dozen or so spring garlic in order to get a pound of scapes. It is the most tender and mellow part of the garlic’s maturation, which can happily find itself strewn throughout a day’s culinary jaunt. The relative docility of this portion of the plant allows it to be freely snipped into salads or sliced into sautés. Of course, as is my habit, whenever applicable, I will be pickling these buds while I simultaneously cooking everything from eggs to pasta all fortified with these stinky florets.
Spring Garlic Roast Pork – yields 4 to 6 servings
2-1/2 pounds boneless pork shoulder
1-teaspoon celery salt
Freshly ground black pepper to taste
1/4-cup red wine
1-tablespoon Worcestershire sauce
1-tablespoon red wine vinegar
Pinch of cayenne pepper
1/4 pound shallots – halved and outer skin discarded
1 head spring garlic – sliced
1/4 pound garlic scapes – sliced into 1/2-inch pieces
Pre-heat the oven to 300-degrees.
Heat an eight-inch cast iron skillet over a high heat. Season the pork with the celery salt and freshly ground black pepper. Then sear the pork in the skillet on all sides, and then pour in the wine, Worcestershire, vinegar and cayenne pepper. Cover the aluminum foil, and place in the oven. Cook the pork for an hour and half. Take the pork from the oven and sprinkle over the halved shallots and sliced garlic head. Return to the oven and cook another hour covered. Once again, remove the pork from the oven and add the sliced garlic scapes. Cook the pork for an additional 30 to 45 minutes, uncovered. Correct seasoning, and serve.
Friday, June 19, 2009
Summer's Scent
Part of the fun of shopping right now is the scratch and sniff portion of the excursion. I am talking about coming across all the herbs that are being grown, and are available to scent my most capricious daily desire. Gone is the default winter choice of: parsley, dill, sage or thyme. In their place summer savory, loveage, lemon balm and chocolate mint are being drafted into everything from salsas to ices creams . I tend to believe any herb can work in any recipe if its aroma gives you joy. Though you do need to keep in mind their aromatic potency. Not all herbs play well and get along with others. Tarragon, rosemary, some of the mints and sage will tend to dominate a concoction, so when I am using these assertive fragrances I will hold back a tad, reserving the right to add a bit more to finish the dish right along with salt and pepper.
The biggest problem with buying herbs is always having more then you’ll need – I am adamant about buying my herbs at the farmer’s market for they're freshest there, and that impacts their shelf life in my kitchen. I store all herbs in a glass with a bit of water in the refrigerator – just like fresh cut flowers. Though, it is this time of year I when I start my all-herb-pesto-jar. When I find myself with an excess of an herb I will puree it with some olive oil, and pour it in a jar. Stored in the freezer, with a thin oil cap, the pesto will last up to six months. All summer along I will feed this jar ending the season with a mixed herb blend that will anoint my winter moments.
Herbed Roasted Chicken - serves 4 to 6 servings
3-1/2 pounds chicken breast – bone in
1/4-cup Italian parsley - leaves only
1/2-cup basil - leaves only
1/8-cup summer savory – leaves only
1/4-cup oregano - leaves only
1/8-cup mint - leaves only
4 garlic cloves - finely diced
1/2-cup fresh lemon juice
1/4-cup olive oil
Salt and black pepper to taste
Roughly chop all the herb leaves, and then mix with the garlic, lemon juice and olive oil. Pour over the chicken and marinate for 3 hours to overnight to infuse the flavors. Just prior to cooking season with salt and pepper.
Pre-heat eh oven to 400 degrees
Lay the chicken down on a lined baking tray. Cook the chicken for 20 to 25 minutes in the oven, or grill over in-direct heat.
Wednesday, June 10, 2009
Green Goddess Revisited.....
I have always been very specific about what I would eat and how I would eat it.
It was crucial that foods never touched unless they were designed to so – in order to get me to eat, best they kept their distance. My nemesis were peas and carrots. They have no botanic lineage that would bring them together, and to add insult to injury my mother only presented them to us unnaturally canned. There was not a more foul smell and texture then these two seemingly arbitrary partners. They were an unfortunate staple on our dinner table and a source, not of vitamins, but arguments that I would lose. My first real attempt at a pea was in my late teens when I was presented a fresh, raw version of the legume unpolluted by the canning process or its ever-present escort. It was a revelation – sweet, crisp everything I did not know it could be. My mother to this day denies the fact it took almost twenty years before she served me a fresh pea. She was of the canned generation -- that post World War Two population driven by security and convenience. She made sure we were well provided for by converting half of our two-car garage into a mini-mart. Never were we without back up, and then some. Typical of her hording was when she packed us all into the car and whisked us off to Walbaums, our local supermarket. She gave us each five bottles of Thousand Island Dressing and a coupon. We arrived home with twenty-five bottles of salad dressing for a grand total of five dollars. I used Green Goddess but it was not on sale. Our inventory always contained powdered milk (I have no memory of it ever being re-hydrated), every kind of soft drink, ketchup (which I hated), canned soups, mayonnaise, and of course, yucky peas and carrots -- were always available with a quick trip downstairs and an easy search through the shelves.
Chopped Spring Salad – yields 6 to 8 servings
1/2-pound bacon
1/2-pound thin asparagus – cut into 1/2-inch pieces
1/4-pound sugar snap peas – cut into thirds
1/2-cup fresh peas
2 small carrots – sliced into 1/2-inch pieces
1/8-pond garlic scapes - chopped
1-bunch radish
3 scallions
Cook the bacon till crisp, and then roughly chop. Hold the bacon to the side.
Place the asparagus, sugar snap peas, peas, carrots and garlic scapes into a sieve. Pour boil water over the vegetables, and let the water drain through.
In a large bowl add the blanched vegetables as well the radishes and scallions. Toss all the vegetables with a cup of green goddess dressing. Sprinkle over the bacon and serve.
Green Goddess Dressing – yields approx. 3 cups
1-pound silken tofu
2-tablespoons olive oil
1-teaspoon lime zest
1/4-cup fresh limejuice
2-tablespoons Dijon-style mustard
1-tablespoon fresh summer savory leaves
1/4-cup chopped chives
1-head spring garlic – roughly chopped
1/8-cup fresh chervil leaves
1-packed cup sorrel leaves – center rib removed
2-teaspoons salt
1/4-teaspoon freshly ground black pepper
Pinch of cayenne
Place the tofu in a sieve sitting in a bowl, and let the tofu drain out its excessive water in the refrigerator for 12 to 24 hours. Discard the water that the tofu has released.
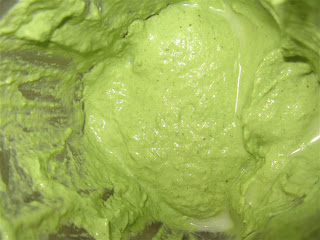
Into the blender or food processor place all the ingredients, and blend until completely smooth.
Store in the refrigerator for up to 2 weeks.
Saturday, June 6, 2009
Green Garlic....
The nose knows that those long, lanky stems are not the doppelganger for leeks but barely adolescent stalks of garlic, which are still edible from root hairs to gentle green tops. Before the garlic swells at its base, and the stem stiffens from a dense inner fibrous shoot, that will support subsequently the flower, I am obliged to eat the entire plant. The root hairs are immediately trimmed from the yet to be recognized bulbous foundation, and stored in freezer bags for an autumn soup or stew. The rest of the plant for now is treated as I would its cousin, scallions, by just peeling away an outer layer and washing any dirt from the remaining stalk. Then chopped, grilled, or caramelized into the myriad of dishes that calls for its more pronounced parent it will go.
The just escaping flower buds are definitely to be harvested and used separately – and for that I will address them separately.
I have been pondering the storage of this stinky rose for a future date. So, into the food processor I am placing these juvenile alliums along with olive oil to make a pesto that will have no relation to the beloved herbaceous concoction of basil except they will both be pastes, and will last about six months in the freezer. I can already envision a chimicurri sauce with this pesto as its base over the grilled meats of summer. Or, when potatoes arrive later in the year I will be serving a green tinted potage.
Spring Garlic Pesto – yields approx 1 quart
3 spring garlic – root hairs trimmed away
4 scallions – root hairs trimmed away
Zest of one lime
1/2-cup pumpkin seeds – lightly toasted
1-teaspoon salt
1/2-teaspoon freshly ground black pepper
3/4-cup olive oil
Roughly chopped the garlic and scallions. Then in a sieve wash them to rid it of any dirt and debris.
Then in a food processor place the garlic, scallions, pumpkin seeds, lime zest, salt and peeper. With the machine running drizzle in the oil – if the pesto seems too thick add a bit more oil. Remove to a storage container. Drizzle a little oil on top of the pesto when it is being stored to prevent it for oxidizing and also to thwart the growth of mold.
Store in the refrigerator for up to a month, or in the freezer for up to six months.
Monday, June 1, 2009
rhubarb
We wait for our plates to take on the full spectrum of a Pantone swatch chart while we feast on all things green. There is however, a moment or two during this chlorophyll filled season of radiance. Radishes are a splash of color that comes to market early and often – they have a very short growing cycle giving that colorful, peppery sharpness quick access to our plates. Just simply tossed with lemon and pepper these early turnip relative is muted joy.
At the other end of the mix comes the puckering note of blushing stalks that claim the cold tundra of Eastern Eurasia as its motherland. Rhubarb does not have to be eaten when the stalks are fully reddened, as they will still deliver tartness packed into every stem. I do admit that I seek out the rouged stems in order to give that little splatter of color in an otherwise verdigris moment.
Yes, I am enjoying the expected pairing with strawberries though since I am not such a pie person I make a rich biscuit for modified shortcake. There has to be other ways to play with these stems…and I have two ideas that will cause me to wait. Firstly, I am putting up rhubarb chutney that will ask the iconic cranberry to enjoy the holidays from the sidelines. Then the innate sourness has taken my thoughts right to vinegar. So, into a jar it sits stewing; macerating; with alchemistic powers informing vinegar.
Rhubarb Vinegar – yields approx 2 quarts
1-pound rhubarb – washed and diced
1 bottle sparkling white wine – such as Moscato, Perseco
1-cup distilled white vinegar
In a clean 3-quart jar place the rhubarb and pour over the wine and vinegar. Cover the jar with a clean cloth secured with a rubber band or string. Place in a cool, dark spot for 3 months. Strain, and store the rhubarb in a clean jar with a thoroughly fitting lid.
Subscribe to:
Posts (Atom)